Imprinted Concrete Knockananna
With over 10 years of encounter in concrete market, PaveLink Concrete has been providing best and top quality concrete services in really competitve price tag in all over Knockananna places . Depending on a Knockananna area We can help you with any concrete services be it New Concrete Driveway paving ,Patterned Driveway or Stenciled Concrete Driveways ,Coloured Concrete Driveways or Concrete Driveways Repairing. Give us a call for our no obligation free quote for any of your concrete services. We are a Totally Licensed, Insured & Family Owned Concreting Business.
Hi, this is Chris I’m the owner of concrete driveways Knockananna
Thanks for checking out my website. I guess you’re thinking of installing a concrete driveway concrete pathway or maybe even a concrete slab. There’s no doubt that a good quality concrete driveway, constructed properly with steel reinforcement adds immense value to your home and will bring years of practical enjoyment and use. In fact just recently one customer who hired our concrete driveways Knockananna company to install a beautiful new concrete driveway sold his home for over 58,000 euro more than he expected! The agent said the new concrete driveway “made all the difference”.
The Patterned Imprinted Concrete Driveways Design Specialists are a Licensed & Insured Company of Experienced Driveway Designers and Master Tradesmen who’ve been installing impressive, high good quality driveways for happy clients in Knockananna for the last 10 years. Recognized for their excellence in Superior Good quality Decorative Driveways Of All Styles, colours and patterns.
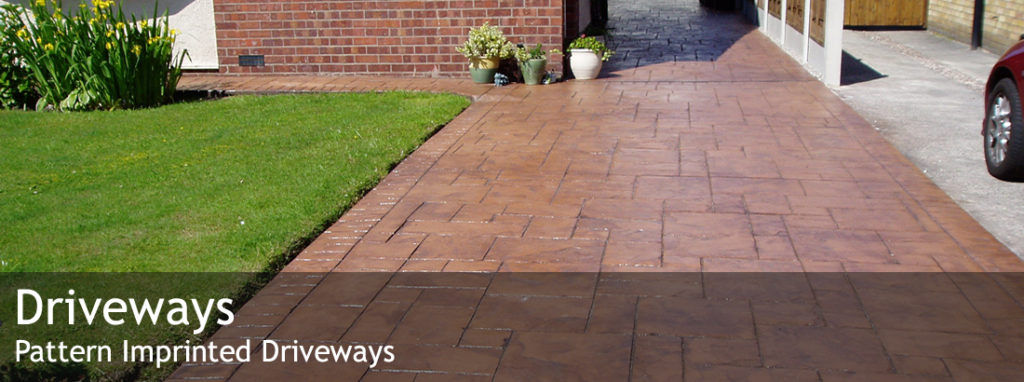
Concrete Driveways
Add value and appeal to your driveway.
Stamped Driveway
Stamped Concrete Driveway – Create designs and patterns that leave behind realistic slate impressions.
Stenciled Concrete
Stenciled Concrete – Designed to resemble brick, slate, flagstone, stone & tile achieving a high-end finish.
Footpaths
Spraytech – Council preferred concrete resurfacing contractor.
Concrete Resurfacing – a cost-effective way to dramatically enhance any concrete surface.
The Concrete Design Specialists focus on attention to detail, which is why their workmanship is superior compared to others.
They take pride in providing Attractive, Durable and Strong Driveways, guaranteeing you the highest top quality materials & workmanship.
PaveLink Creating Knockananna Driveways & Servicing Knockananna for the last 10, years with 20yrs in the concrete market There is no doubt that a properly constructed driveway will add immense value (in most cases) to your largest asset, your home. Concrete driveways permanently improve the property’s appearance & they are a low maintenance option. So, if you are thinking of installing a concrete driveway or a concrete pathway, sealing a concrete driveway or even need a concrete slab, And I’m sure you will have some questions about costs, so please feel free to contact me.
We’re Knockananna Very best Concrete Driveways Contractors Company
Our concrete driveways are designed to perform well for many years to come and to always look their most effective. To this end, we have become real experts in the field of decorative concrete driveways. Decorative concrete will provide a professional long lasting appearance and these days, you are only limited by your imagination. If you want the unique look of conventional floor tiles, brick or block paving, and other custom finishes, it can be achieved quickly and cost-effectively. And the best part is that as well as a distinctive contemporary look, you’ll have the added advantage of no weeds growing through the cracks. We can show you some amazing designs according to Concrete Stencilling, Stamped Concrete (available in a range of patterns and textures) and Coloured Concrete in a wide choice of modern colours
Pavelink Concreting Services Include:
Concrete Slabs Concrete Driveways Stencil Concrete Retaining Walls Concrete Cleaning
Stamped Concrete Decorative Concrete Concrete Sealing Concrete Stencilling Pattern Concrete
Driveway Cleaning Driveway Sealing Coloured Concrete And much more!
Our Commitment To You
We provide you peace of mind with our “7 Year Works Guarantee“.
We offer friendly service and guidance.
All works have total excellent control and direct supervision
You are provided with direct mobile contact 24/7 to their dedicated works supervisor.
We engage only the very best tradesmen & materials.
We work within strict time-limits (Yes…that’s your time limits).
We do everything possible to meet your expectations.
All our staffs are highly qualified clean, skilled, Friendly, professional, and well mannered .
PaveLink are expert Concreters with years of expertise, able to fulfill all your concreting needs.We do all kind of concrete work such as driveways paths extensions all finishes on concrete e.g(colour, stamp or stencil), house slabs garages retaining walls,commercial and industrial.Also we do all excavation work including pier holes,concrete repair and resurfacing.
House slabs start soon after plans are received we take care and great pride in our work, everything done professionally.
- We are a family owned business with more than 10 years of experiences.
- We are fully licensed and insured. We also take care of council approvals.
- We will send no obligation s written quotes!
- We give advice on the greatest way to approach a job E.G (old driveways to new driveways)
- All jobs sites are left tidy and clean after work has been completed .
- For commercial and industrial job site we’re fully insured and all members are in possession of green cards.
- Our Prices are Competitive And Reasonable .

Knockananna (Irish: Cnoc an Eanaigh, meaning “Hill of the Marsh”) is a village in County Wicklow, Ireland.
The village has a GAA team and the club colours are red and white.
A Guide to Pattern Imprint Concrete for your Driveway
Step By Step Guide To: The Best Ways To Sucessfully Imprint Concrete
There are several of actions involved in inscribing concrete, and only a little time structure within which to get them done. This is not such as when applying a decorative finish or tarnish to concrete paving, those who carry out the job should complete the whole pattern inscribed method prior to the fresh concrete collections. To do the work well, professionals have to be experienced, arranged, and really ready. For large projects particularly, that implies diagraming the inscribing layout ahead of time, having the imprinting devices lined up and ready to go, and making sure adequate labor is available for the job handy.
Adding Colour Hardener
After the concrete gets to the ideal phase of plasticity (normally when no bleedwater gets on the surface area), transmitted the color hardener by tossing it into the surface from waist level or a little bit reduced to minimize the quantity of product that wanders right into the air. Job from the center of the concreted area and back toward the side forms to stay clear of a heavy buildup of color hardener on the edges. After the initial shake of color hardener has been put on the surface, provide it 5 to 10 minutes to soak up water from the concrete and then float it right into the surface. Right after bull floating the first application of color hardener, follow the exact same steps and use a 2nd layer of hardener to ensure total insurance coverage.
Including The Release Agent
Powdered or fluid release agents serve two vital purposes: They impart subtle color contrast while working as a bond breaker to stop the inscribing mats or skins from adhering to the concrete and disturbing the imprint texture. The very best method to apply a powdered release is with a completely dry tampico brush regarding 8 inches wide. Dip the brush right into the container of launch and fluff it to fill the bristles and layer them uniformly. After that take the brush by the handle, holding it below belt degree, and use your wrist to snap the release into the surface in a light, consistent layer.
To apply a liquid launch agent, utilize a pump-type sprayer to apply the release in a consistent layer onto the surface area of the concrete right prior to you stamp. If you prepare to make use of a tinted liquid launch agent, include the tint a day or 2 beforehand if possible. This will allow the pigment fragments to fully dissolve.
Checking If The Concrete Is Ready?
Before you start inscribing, check to see that the concrete has reached the appropriate phase of plasticity. If you begin imprinting prematurely, the concrete won’t be firm adequate to sustain the weight of workers or hold a distinct imprint. If you start imprinting too late, not just will imprinting call for more job, you’ll create little or no structure with the imprint stamps, especially as you get to the end of the work. Press your fingers right into the concrete surface at numerous areas on the concreted location. If you leave a clean imprint regarding 3/16 to 1/4 inch deep, you can usually start inscribing. An additional examination is to position a stamp on the concrete and action on it. The stamp needs to hold your weight and not move around or sink as well deeply into the surface area.
Before imprinting, pretexture along the perimeter of the concreted area with a texturing skin or flex floor covering.
Pretexture The Concreted Area Perimeter
Pretexture along the border edges of the concreted area about 6 to 12 inches inward with a texturing skin or flex floor covering. This action is very important because when you’re dealing with a nonflexible stamp, the device will certainly overlap the edge of the form and you wonâEUR ™ t have the ability to totally dispirit it into the concrete surface area. By pretexturing the boundary first, you’ll obtain the texture you need and the full shade from the launch.
The First Row Of Imprint Stamps
When the sides are pretextured, the crew can start inscribing the remainder of the concreted area with the floor covering devices. Normally, you should mark in the same series that you placed and ended up the concrete. For example, if you started putting the concrete in the leading left-hand corner of the concreted area and upright the lower best edge, this would certainly be the preferred sequence to use for ending up and inscribing procedures, functioning row by row from the beginning point to completion factor. Many stamp sets are identified with letters or numbers. Always arrange the imprint stamps in the sequence advised by the producer, such as ‘A’, ‘B’, ‘C’ or ‘1’, ‘2’, ‘3’.
It’s crucial to place the first row of imprint stamps on a straight line since that will work as the standard for the rest of the job. If it’s not perfectly right, the remainder of the rows will certainly run out placement too. Use a string line as an overview, specifically for straightening stamp patterns that are square or rectangle-shaped. For notched or irregular stamp patterns, you could check alignment by using the side type as a recommendation point (assuming that it’s square). Utilize a string line or tape measure and run it from the edge of the type to the top and bottom sides of the stamp floor covering to make sure the device is running square about the kind.
The Imprinting Sequence
If the concrete is at the suitable stage for inscribing, you should be able to thrill the imprint stamps into the surface by merely strolling on the devices, perhaps followed by a light tamping. The imprinting staff must complete the very first row prior to moving on to the 2nd one. Generally, one person will place the starter tools and depend on them while ordering imprint stamps from the first row and leapfrogging them right into the next row. While he or she is moving and advancing the devices, another person could do the tamping. Relying on the stamp pattern, a third person may be should information the cement joints.
Needed Detailing Work
Even if you have pretextured the sides and utilized a flex mat against walls, you will certainly commonly find it necessary to do some specificing with a hand chisel, roller, or appearance skin to eliminate displaced concrete paste that comes up through the joints in between imprint stamps, to repair any kind of obscured pattern lines, and to deal with grout joints where the stamp wasn’t tamped down with sufficient pressure. With many stamp patterns, you’ll achieve far better outcomes if you detail the same day, either as the imprint stamps are being progressed or before going home at the end of the day. For retouching or dealing with minor surface area flaws, you can utilize a texture skin as an eraser to fix disproportion or nonuniformity by patting it right into the area until it’s degree then reimprinting with the proper mat tool.
Removal Of Excess Release Agent And Addition Of Curing Compound
If you’ve used a colored launch powder to the concrete surface, you can not use a healing substance until you wash off the residual release agent-a minimum of someday and sometimes 2 or three days later, depending on climate condition. When the surface area is adequately cleaned and enabled to completely dry, you can after that spray on a fluid membrane-forming curing compound or a remedy and seal to keep wetness in the concrete. If you’re utilizing a clear or tinted fluid launch, you can generally use the curing membrane to the concreted location the exact same day. Inspect the launch maker’s recommendations for treating.
Adding Joints
Cutting contraction joints (additionally called control joints) at the correct deepness and spacing in the concreted location not long after placement provides tension alleviation at intended places and prevents unchecked arbitrary breaking. You could develop joints in the concrete as it starts to set utilizing a groover or you could wait to cut the joint up until after the concrete has established utilizing a saw furnished with a ruby or unpleasant blade. Usually, a sawed joint is less visible compared to grooving.
Including Sealant
When the concreted area has cured completely, you must apply a finish layer of sealant. Many makers suggest using the sealer a number of weeks later, after a light surface area cleaning. Be careful not to use the sealer as well greatly, which can catch dampness in the concreted area. One of the most efficient strategies for using sealant is to combine both spraying and rolling, particularly when the stamped pattern has deep grout lines. Returning over the surface with a roller where needed helps to disperse the sealer uniformly.
Pattern Imprinted Paving Tips
Below are some helpful tips:
- If you’re utilizing a brand-new stamp pattern for the very first time, experiment the devices on compressed sand before utilizing them in concrete;
- Avoid pattern repeating, specifically with patterns that imitate all-natural products such as rock or slate. A random structure will look a lot more reasonable;
- You’ll improve outcomes if you precondition, or layer, your stamp mats with several of the launch agent. This will offer added bond breaking to help make sure a clean imprint;
- To acquire an arbitrary antiquing impact, apply a really small amount of powdered launch to the surface of the concrete and then spray the liquid launch over the top of it. The liquid dissolves the light layer of powder to leave refined accents after the surface area is marked;
- Make certain the launch agent obtains well-compressed right into the concrete by the stamp. Or else, it will merely wash off the surface area without leaving the preferred colour;
- Periodically examine the placement of the imprint stamps every number of rows using a string line. It’s not uncommon for imprint stamps to change as high as 1/4 inch each row, particularly on sloped areas;
- On numerous tasks, you’ll be confronted with needing to mark against a vertical surface, such as a wall surface or a column. Make use of a floppy mat and texturing to flex or flex against these surface areas;
- Make sure that the individual walking on and moving the imprint stamps is putting on clean boots or work footwear, free of any pebbles, mud, or other debris.
- Unavoidably, these impurities will wind up on top of the imprint stamps and fall into the fresh concrete surface as the imprint stamps are being raised;
- If you’re using a powdered release, you could save time by sawcutting the contraction joints prior to eliminating the launch. This allows you to remove the launch residue and the dirt produced from sawing in one action.